
Before we get started, let’s take a look at the image we’ll be creating. As always, the layered Photoshop file is available via our Psdtuts+ Plus membership.
So, are you ready to start? Like every tutorial, it is recommended to use the latest version of Photoshop.
Step 1
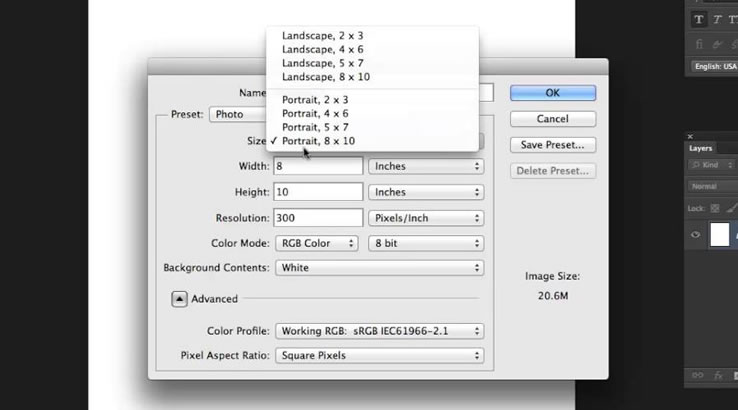
Let’s open a new document using the settings shown below.
Step 2
Now we’ll need to have some guides to make sure that everything in our document will be in the right place. And in order to put the guides in the correct place, we’ll make some fixed sized selections.
Get the Rectangular Marque Tool, set style to Fixed Size and set Width and Height to 140 pixels. Click on the canvas, then while holding the left mouse button place the selection to the top left corner. Drag one horizontal and one vertical guide and snap them to the edges of the selection.
Drag the selection to the right bottom corner and get two more guides. Because we want our tool to snap to these guides, make sure that View > Snap is active.
Step 3
We can start drawing now. First create a new layer and name it “Upside.” Pick 65% gray as your Foreground Color. Get the Rounded Rectangle Tool, set the Radius to 40 pixels, and select Fill Pixels in the tool options. Draw a rounded square as in the below image.
Go to Filter > Noise > Add Noise, then set the Amount to 2%. Also, set Distribution to Uniform and make sure that Monochromatic is checked.
This is a test
This is a reply
We can start drawing now. First create a new layer and name it “Upside.” Pick 65% gray as your Foreground Color. Get the Rounded Rectangle Tool, set the Radius to 40 pixels, and select Fill Pixels in the tool options. Draw a rounded square as in the below image.
Go to Filter > Noise > Add Noise, then set the Amount to 2%. Also, set Distribution to Uniform and make sure that Monochromatic is checked.